Note: I copied and pasted the code directly from tumblr so OF COURSE it's a total mess and the photos are tiny and horrible. BUT I wanted to have this up here. I'll rehost the FULL SIZE images and fix this post's formatting later.
Welcome to the first part in a series of tutorials on using the world-wide citizen science website/app/paradise that is iNaturalist [link]. They have their own tutorials on using the website [link], but coughs they haven’t been updated in a while and the interface changed a little.
I’m trying to encourage tumblr peeps to try out iNaturalist, so I created an “iNatters of tumblr” group [link] for us all to see what everybody else encounters, help each other ID things, and otherwise just have a fun time while contributing to science! Want to join us? Just create an account on iNaturalist, and either send me your username (on tumblr or on iNat!) and/or follow the group (click the button in the top right corner of the group page). I will add you to the list of identifiers, and all of your observations, past and present, will be added to the group! Check out my tagged posts about this project! [link]
Figuring out any new website or app can be confusing and frustrating, and I hope these tutorials will make it easier to start using iNaturalist. If anything I say is unclear, confusing, or doesn’t match what you see, just let me know and I will update this tutorial with a better explanation.
These tutorials are image-heavy and kinda long, so they will be under a cut. Note: I have the iPhone version of the app, so you may see a slightly different interface on another device.
Observation Tutorial Part 1: Making Observations with the Mobile App
First Thing’s First! Let’s check out your settings!
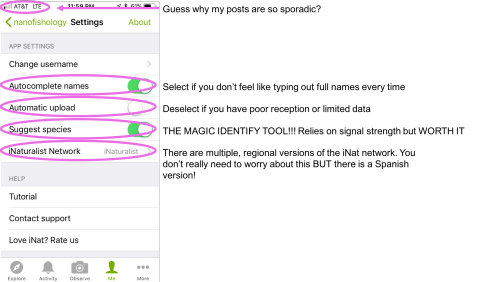
Most of these settings are self-explanatory.
Automatic Upload
The app defaults to automatic upload, which means it will start uploading your observations as soon as you save them. If you are doing a bioblitz, or are in an area with limited cell reception, this option can slow down the app and drain your battery. If you turn off this option, you will need to push the “upload” button to post your observations so others can see them.
Suggest Species
This option is MAGICAL. It was first rolled out about a year ago, and HOLY CARP it’s pretty good! But, it does have limitations. First, it requires a good signal and can slow you down and eat up your battery. Also, it works based off a machine-learning system from observations previously uploaded and verified on iNaturalist. What this means: The identify tool can only successfully identify things that have been observed and identified by other real humans. Also, it only uses your main photo (the first one), and it can get thrown off if it was taken at a weird angle, or if there is lots of other stuff in the background (like plants, rocks, other bugs). And, very important to note: it does not take your location into consideration. There is a very heavy user-base in New Zealand, so it is fairly common for species that only occur in New Zealand to be suggested. So, use your best judgement. If you think something is a Booger Beetle, but the app suggests Snot Weevil, ignore the app. OR, you can stick to a higher classification (Beetles) and come back to it later. You can always change your mind!
iNaturalist Network
You don’t really need to worry about this too much. There are a bunch of “flavors” of iNaturalist, and which network you select is the one your data will stick to in the event that the iNaturalist Network breaks up. They are more or less regional. More information about the networks here [link]
Okay, let’s take some photos!
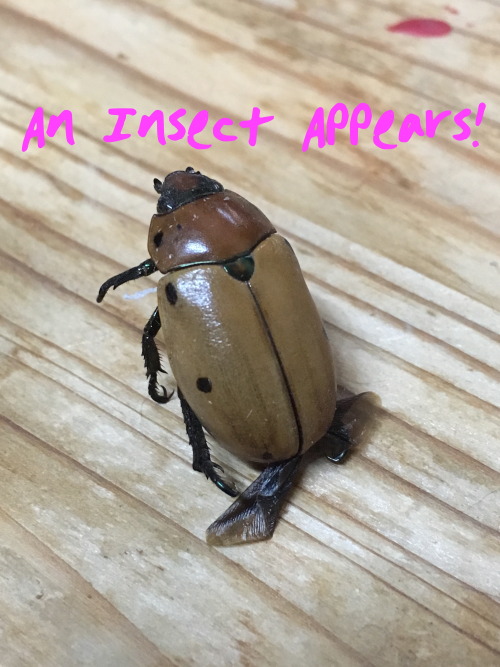
Wow, nice! You have two options for making observations with the mobile app.
Option 1: Take the photo now, worry about iNat later
Option 2: Take the photo using the iNat app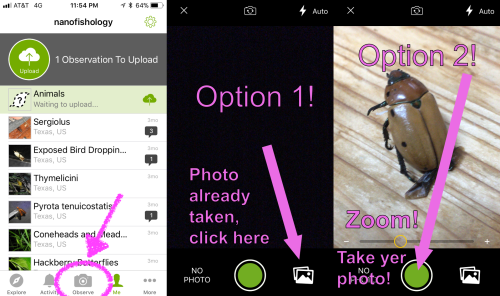
I recommend choosing Option 1 if you are taking photos of things that may move, because the app has a bit of a delay, and the quality tends to not be as good. I use Option 1 almost exclusively, because it’s easier to take my photos and do bulk uploads when I’m inside and not being chased by mosquitos. Option 2 is better if your subject isn’t moving too fast, and if you are just observing a couple things (and also if you don’t want to build up a several-month-long backlog of photos on your phone…).
You can take and select multiple photos! Try to get different angles, and photograph different parts of your subject to help with IDs later.
Advanced iNatter Option
If you take photos with your phone to upload later, you have the option of annotating your photos! This is helpful if you have more than one specimen in the photo, or if your specimen is well camouflaged. You can also point out important features, like I did below. Any edits you do to your photos before you upload them can really help out people who do IDs!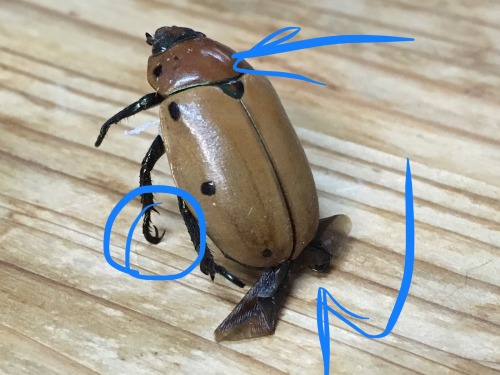
Regardless of which option you choose, you will end up at your observation page!
Adding identifications to your observations
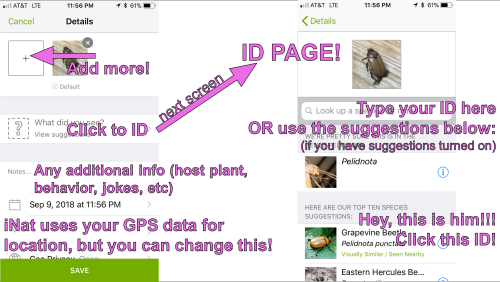
From your observation page (on the left above), you can add more photos, add an ID, write notes, and edit time and location information. More on those options later! First, let’s click “What did you see?” to get to the ID page.
If you have “Suggest species” turned on, the app guesses what you saw. Clicking the information symbol to the right will show you more information on each species to help you decide if that ID is a good fit. Feel free to pick whatever you think is closest, and other people will agree with you OR suggest other identifications later.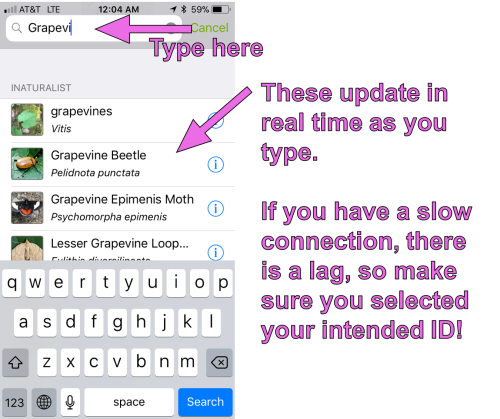
If you know what you saw, or if you have a guess, go ahead and type it into the search bar. If you have autocomplete on, it will (guess what!) autocomplete what you are typing. If you have a slow connection, LOOK OUT because you might accidentally select the wrong ID due to lag.
Editing Location and Privacy
Depending on your phone’s privacy settings, your photos will automatically have a GPS stamp on them, so if you are adding photos to iNat later, you usually don’t need to worry about remembering where you took them. If you have this feature turned off for your phone, that’s fine! Or, if you have that option turned on, and your photos are GPS tagged, you can still protect your privacy while keeping the location data useful for scientists and researchers.
If you are wondering, “Why is location even important? Why should I bother?” There are a couple answers! First, there are very few species present worldwide. For the most part, in order to identify something, it is essentially to know where it was. Sometimes, you can be vague, and just stating the country is good enough detail to identify something (common for larger animals, like birds and mammals, and larger plants like trees). But other times, you need to be extremely specific. Some insects look nearly identical to each other, but there will be different species living on one side of a mountain range vs the other side, even if they are only 20 miles apart. And also, researchers who are tracking the movement of species in response to climate change can benefit from having access to accurate data–showing that a species of plant is appearing even several miles north each year is crucial to understanding how to manage environmental stewardship.
If you are out and about, and have GPS phototagging on, you don’t really need to edit your location (unless you want to!). If you have GPS tagging off, or the location data was a little off, OR you want to protect your privacy (observations at your house, for example), here’s what ya do: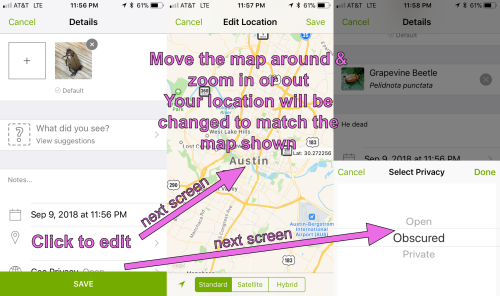
Click the area on your observation page with location (I blanked those details out of my screencap). You will be taken to a map. Clicking the green arrow takes you to your current location. You can zoom in or out of the map (unfortunately, you can’t just type in an address on the mobile app, but you CAN on the website, and you CAN edit posts you made from the mobile app on the website later!). When the location you want is centered on the map, zoom in or out to set your accuracy (if you can’t remember where you were, but you KNOW you were somewhere in Austin, you would basically do what I have above in my map).
If you don’t want to edit the location, but you don’t want the entire world to know where your photos were taken, you can change the GeoPrivacy setting (kinda cut off in the screencap, but it’s directly underneath location). You can select three options:
Open: Everybody can see where your observations were made
Obscured: iNaturalist will create large square that contains your true location at some random point within the square. All observations with obscured coordinates will be randomly assigned to one point in that square. Only you can see those coordinates (one exception is if you join a very specific type of project, and you have opted-in to let project curators see obscured coordinates).
Private: No location information is shared. You may select this option if you want, BUT keep in mind it will be very difficult for people to help identify your observations!
For more information on GeoPrivacy, iNaturalist provides more information here [link]
Adding Observations to Projects
iNaturalist has many different kinds of projects [link]. The “iNatters of tumblr” project is a “collection” project type, which automatically adds observations meeting specific criteria (in our case, all observations made by users I have added to the project). Another type of of project, the “traditional” project type, was originally the only type of project available. It’s great for collecting some very specific observations that you can’t really search for. Two of my favorites are “Mating Behaviour” and “Animated Observations” [both are links]. The downside of these kinds of projects is somebody has to manually add each observation to the project. If you have joined one of these kinds of projects, you can link them to your observation before you save it. You can also add observations to projects any time later.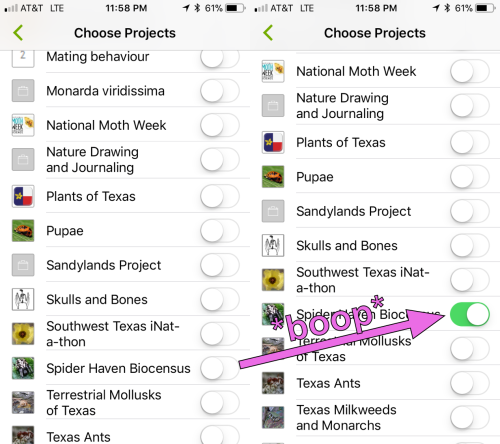
To link your observation with a project, you must have joined a project first. Afterwards, just click the button and you’re done!
Saving and Uploading
You’re almost done! Just ONE final step. Save!!! Click the big green SAVE button at the bottom, and you see your beautiful observation: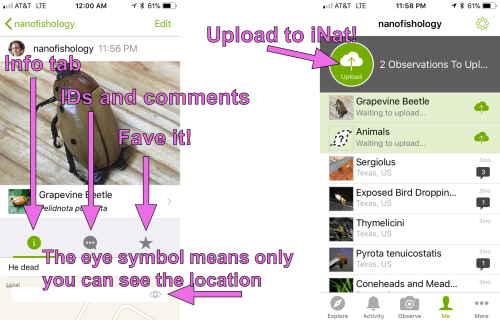
If you have Auto Uploads turned off, you need to click the upload button to start uploading. That’s it! Congratulations!
If you take your photos with a camera, or if you want to upload a BUNCH of observations at one time, you will want to make your observations on the website, rather than the mobile app. Making observations on the iNaturalist website will be the subject of Tutorial 2!
September 18, 2018


